A Chatroom "on Rails"
I recently built a simple, user friendly chat room to learn how to utilize WebSockets to perform communication via Ruby on Rails’ ActionCable using Rails 6 and Ruby 2.7.
Why focus on learning how to use ActionCable? Well, someday soon, I would like to create collaborative drawing and comics composition tools that allow users to work on the same canvas realtime to do that I predict I’ll have to engage with Websockets and ActionCable is how Rails engages with Websockets!
I’m sharing this project here to show it all works.
First off, here’s the repo on Github. Feel free to poke around the code and even try it out for yourself!
What are WebSockets
WebSocket is actually a protocol that enables bidirectional communication between the client and the server of a web application over a single long living TCP connection.
The WebSocket protocol enables interaction between a web browser (or other client application) and a web server with lower overheads, facilitating real-time data transfer from and to the server.
This is made possible by providing a standardized way for the server to send content to the client without being first requested by the client, and allowing messages to be passed back and forth while keeping the connection open. In this way, a two-way ongoing conversation can take place between the client and the server.
The communications are done over TCP port number 80 (or 443 in the case of TLS-encrypted connections), which is of benefit for those environments which block non-web Internet connections using a firewall. Similar two-way browser-server communications have been achieved in non-standardized ways using stopgap technologies such as Comet. – WebSocket @ Wikipedia
Why WebSockets
Suppose you have to create a web page that shows the statuses of running processes. Without WebSockets you would have to either:
- Use AJAX with Javascript intervals to request and render the latest state of the processes or
- Automatically reload the page every x seconds () or
- Add a message on the page “The statuses are not updated automatically ¯_(ツ)_/¯ Press here to reload the page.” All of these methods would request the process statuses from the server even if nothing has changed.
WebSockets are here to allow this communication to take place on demand. The cost is having to keep alive TCP connections between the server and all its clients (each for every open browser tab).
The Application
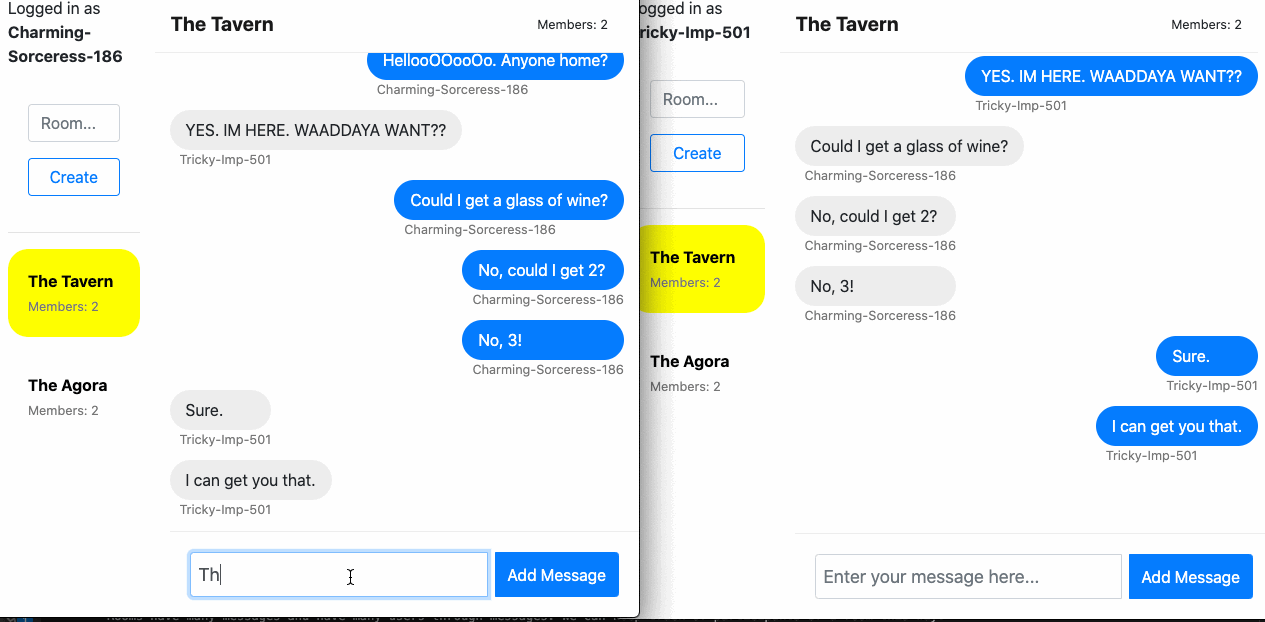
In this Rails app, users can create rooms, join rooms and add messages to rooms while receiving new messages real-time. It consists of 3 models: room, user, and message, 1 channel: room, and 1 job: send_message. The App uses bootstrap for simple styling.
How it works:
Users: Users are automatically created on a session by session basis. They are assigned a randomly generated username. The code for this is in user.rb.
class User < ApplicationRecord

    validates_uniqueness_of :username

    def self.generate
        adjectives = ['Tricky', 'Monolithic', 'Gleeful', 'Barbaric', 'Glowing', 'Charming', 'Shiny', 'Mysterious']
        nouns = ['Knight', 'Skeleton', 'Imp', 'Troll', 'Dragon', 'Warrior', 'Sorceress', 'Witch', 'Goblin']
        number = rand.to_s[2..4]
        username = "#{adjectives.sample}-#{nouns.sample}-#{number}"
        create(username: username)
    end
end
Rooms: Whenever a user moves to a different room they unsubscribe from all channels and then subscribe to the appropriate room channel. Rooms have many messages and have many users through messages. We can keep track of participants of a room this way.
A note on how some important housekeeping occurs: At the top of the root view, rooms’ index.html.erb there are two divs that this App uses to keep track of who the current user is and what room we are in. The Event Listener in room_channel.js checks these values to help it do its work as intended.
Messages: Messages belong to rooms and users.
Every time a room message is being created, we broadcast it to the message’s room stream, which is done in several steps across several files. First off, when a user submits a message in a room, the message controller creates a message, saves it to the db and calls a background job.
def create
    @message = Message.new(message_params)

    @message.user = current_user
    @message.save

    SendMessageJob.perform_later(@message)
end
Then this background job, SendMessageJob found in send_message_job.rb takes the message and creates objects that contain the html that the chat log will need. This job adds all of this to the broadcast in the form of three objects: mine, theirs, and message(accessible via data.theirs, etc.). This html is created via the corresponding partials in the messages views (_mine.html.erb, etc.). This data is broadcast to all subscribers of the channel of the room that the message came from.
class SendMessageJob < ApplicationJob
  queue_as :default

  def perform(message)
    mine = ApplicationController.render(
      partial: 'messages/mine',
      locals: { message: message }
    )
    theirs = ApplicationController.render(
      partial: 'messages/theirs',
      locals: { message: message }
    )

    ActionCable.server.broadcast "room_channel_#{message.room_id}", mine: mine, theirs: theirs, message: message
  end
end
Whenever the channel receives data, the App performs the key actions in room_channel.js’s received(data) function. Here we declare an html variable which we will assign the value of the html that we plan to append to the chat log. Critical here is checking to see if the message was from the current user. If it was, it will set use the mine object, otherwise it uses the theirs object. This is done for the sake of arranging the messages on the left or right of the chatroom as one would expect.
import consumer from "./consumer"

// All the code here is run in this event listener because
// we want to make sure it has all loaded as needed before moving on.
document.addEventListener("turbolinks:load", () => {
  const room_element = document.getElementById('room-id');
  const room_id = Number(room_element.getAttribute('data-room-id'));

  // removes all subscriptions so we can start anew when you enter a new room
  consumer.subscriptions.subscriptions.forEach((subscription) => {
    consumer.subscriptions.remove(subscription)
  })
  // Subscribes to the current channel based on the information stored in the div in rooms view: index.html.erb
  consumer.subscriptions.create({ channel: "RoomChannel", room_id: room_id }, {
    connected() {
      console.log("Connected to " + room_id);
    },

    disconnected() {
      // Called when the subscription has been terminated by the server
      // console.log("Disconnected.")
    },

    received(data) {
      // Called when there's incoming data on the websocket for this channel
      let html;
      // Identifies whether or not the current user has sent the information
      const user_element = document.getElementById('user-id');
      const user_id = Number(user_element.getAttribute('data-user-id'));
      // The html is formatted differently to include a different class if the message
      // is from the current user or not. This is for the sake of arranging the messages
      // on the left or right of the chatroom as one would expect.
      if (user_id === data.message.user_id) {
        html = data.mine
      } else {
        html = data.theirs
      }
      // here we append the html that we have created to the end of the chatroom
      const messageContainer = document.getElementById('messages')
      messageContainer.innerHTML = messageContainer.innerHTML + html
    }
  });
})
Some additional notes about the nitty gritty:
We clear the message field by using some javascript from the create.js.erb is run when the user submits a message that clears the contents of the form and re-enables submission.
var chatBtn = document.getElementById('chat-btn');
chatBtn.disabled = false;

var chatBox = document.getElementById('message_content');
chatBox.value = '';
Installation
Prerequisites
This installations expects the following to be installed on the system.
1. Check out the repository
git clone git@github.com:juanjosefernandez/chatroom.git
2. Create and setup the database
Once you are in the chatroom directory on your machine, run the following commands to create and setup the database.
bundle exec rake db:create
bundle exec rake db:migrate
3. Start the Rails server
You can start the rails server using the command given below.
bundle exec rails s
And now you can visit the site with the URL http://localhost:3000
Usage
To test this out locally on your computer, once you are live, visit http://localhost:3000 using any combination of different browsers and/or incognito windows. Create a couple of rooms and chat with yourself, real-time! Yay, websockets!
    🎶 Currently listening to:

    Harold Budd - Templar